카메라
StartActivityResult 함수가 deprecated 된다고 해서 Android developer와 다른 블로그 글들을 참고해서 권고되는 코드로 구성하였음
갤러리에서 이미지 열기
val getContent = registerForActivityResult(GetContent()) { uri: Uri? ->
    // Handle the returned Uri

    // 여기서 갤러리의 이미지 Uri를 어떻게 처리할 지 정할 수 있음
}

override fun onCreate(savedInstanceState: Bundle?) {
    // ...

    val selectButton = findViewById<Button>(R.id.select_button)

    selectButton.setOnClickListener {
        // Pass in the mime type you'd like to allow the user to select
        // as the input
        getContent.launch("image/*")
    }
}
카메라 인텐트를 통해 이미지 촬영후 가져오기
class MainActivity : AppCompatActivity() {
    lateinit var bt_open_camera:Button
    lateinit var iv_photo:ImageView

    private lateinit var resultLauncher: ActivityResultLauncher<Intent>

    override fun onCreate(savedInstanceState: Bundle?) {
        super.onCreate(savedInstanceState)
        setContentView(R.layout.activity_main)

        bt_open_camera = findViewById<Button>(R.id.bt_open_camera)
        iv_photo = findViewById<ImageView>(R.id.iv_photo)

        // Activity에서 온 result를 처리하는 Launcher
        // 콜백을 등록하는 것임
        resultLauncher =
            registerForActivityResult(ActivityResultContracts.StartActivityForResult()) { result ->
                if (result.resultCode == Activity.RESULT_OK) {
                    handleCameraImage(result.data) // Launcher가 카메라 촬영을 성공적으로 마쳤다는 resultCode를 받았을 경우 실행
                }
            }

        // Launcher에 카메라 촬영하는 Intent 보냄
        bt_open_camera.setOnClickListener {
            val cameraIntent = Intent(MediaStore.ACTION_IMAGE_CAPTURE)
            resultLauncher.launch(cameraIntent)
        }
    }

    private fun handleCameraImage(intent: Intent?) {

        // "data"라는 key로 온 이미지 데이터를 받음
        val bitmap = intent?.extras?.get("data") as Bitmap

        // 이미지뷰의 이미지 변경
        iv_photo.setImageBitmap(bitmap)
    }

}
Image가 의도와 달리 회전되어 보일 때
갤러리에서 uri를 통해 이미지를 가져왔는데 이미지가 회전되어져서 출력되는 경우가 굉장히 자주 있다. 그 이유는 핸드폰을 세로로 들고(평상시처럼 들고) 촬영하면 90도 회전되어 있다는 메타정보가 들어가게 된다. 특히 Bitmap을 다룰 때 자주 발생하는 문제인 듯 하다.
갤러리나 ImageView에서는 이러한 정보를 읽어서 미리 화면을 회전시켜놓은 것이고, 따라서 갤러리에서 보이던 이미지들은 한번 회전 처리가 되어있는 것이다.
그래도 궁금한 사람들을 위해 확인해 볼 수 있는 코드를 제시한다.
// filepath에 이미지 uri 입력

fun getOrientationOfImage(filepath : String): Int? {
        var exif : ExifInterface? = null
        var result: Int? = null
        try{
            exif = ExifInterface(filepath)
        }catch (e: Exception){
            e.printStackTrace()
            return -1
        }
        val orientation = exif.getAttributeInt(ExifInterface.TAG_ORIENTATION, -1)
        if(orientation != -1){
            result = when(orientation){
                ExifInterface.ORIENTATION_ROTATE_90 -> {90
                    Log.d(TAG, "rotation 90")}
                ExifInterface.ORIENTATION_ROTATE_180 -> {180
                    Log.d(TAG, "rotation 180")}
                ExifInterface.ORIENTATION_ROTATE_270 -> {270
                    Log.d(TAG, "rotation 270")}
                else -> 0
            }
        }
        return result
    }
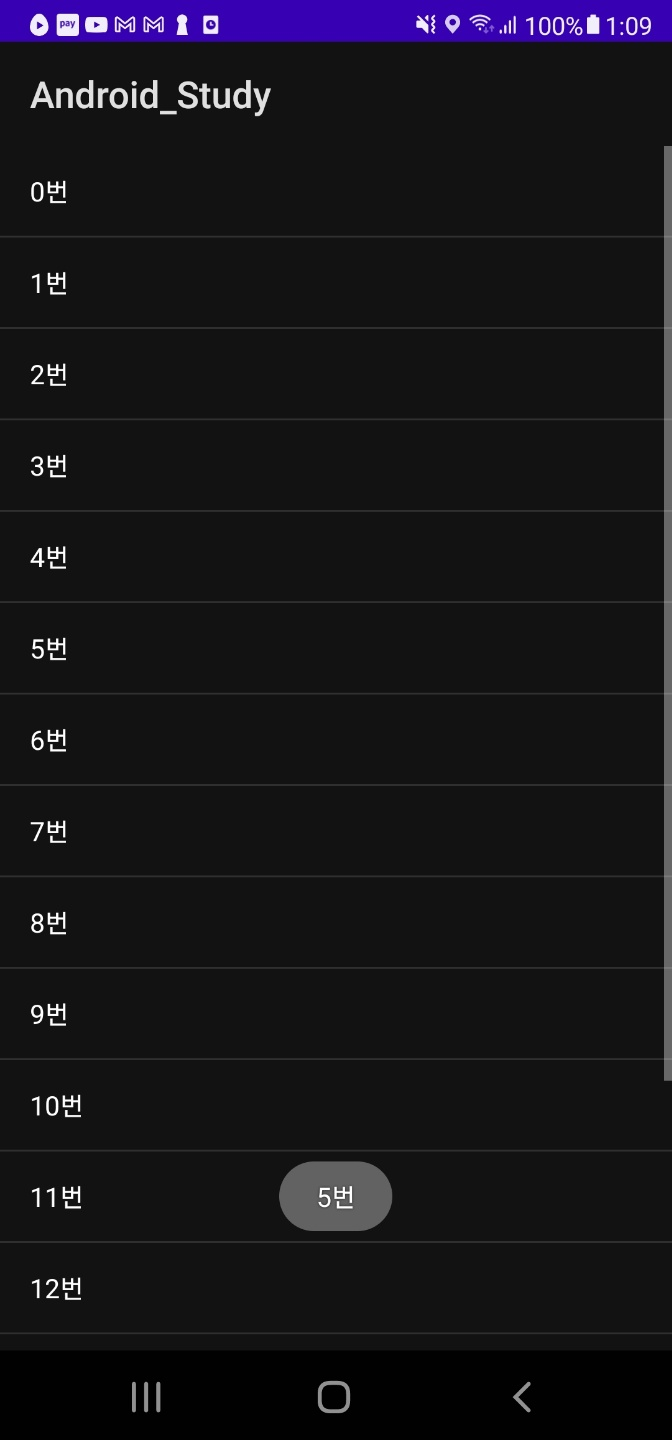
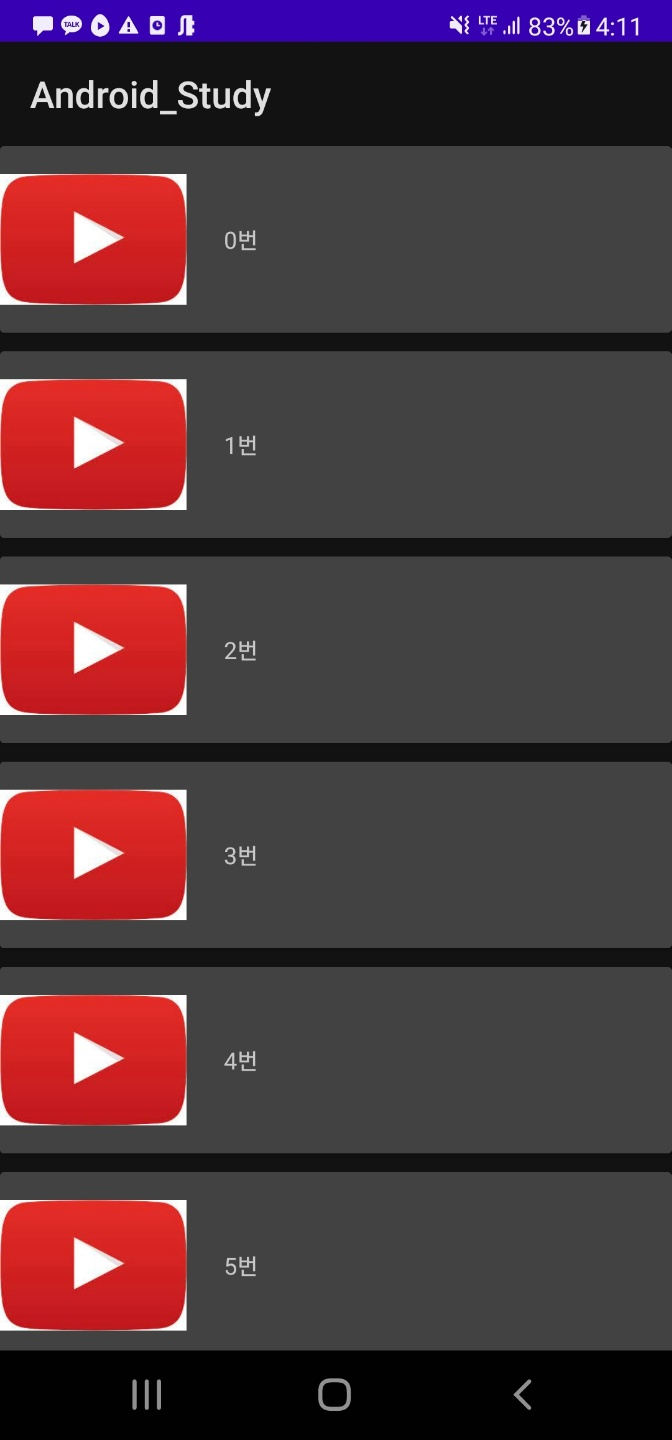
List View (리스트 뷰)
simple_list_item_1
<?xml version="1.0" encoding="utf-8"?>
<androidx.constraintlayout.widget.ConstraintLayout xmlns:android="http://schemas.android.com/apk/res/android"
    xmlns:app="http://schemas.android.com/apk/res-auto"
    xmlns:tools="http://schemas.android.com/tools"
    android:layout_width="match_parent"
    android:layout_height="match_parent"
    tools:context=".ListviewActivity">

    <ListView
        android:id="@+id/listView"
        android:layout_width="match_parent"
        android:layout_height="match_parent" />

</androidx.constraintlayout.widget.ConstraintLayout>
class ListviewActivity : AppCompatActivity() {
    override fun onCreate(savedInstanceState: Bundle?) {
        super.onCreate(savedInstanceState)
        setContentView(R.layout.activity_listview)

        val listView = findViewById<ListView>(R.id.listView)

        val item = arrayOf("0번", "1번", "2번", "3번", "4번", "5번", "6번", "7번", "8번", "9번", "10번", "11번", "12번", "13번", "14번", "15번", "16번")
        listView.adapter = ArrayAdapter(this, android.R.layout.simple_list_item_1, item)

        listView.onItemClickListener = AdapterView.OnItemClickListener { parent, view, position, id ->

            // 매개변수로 parent, view, position, id 4개가 주어져야함

           val selectItem = parent.getItemAtPosition(position)
            Toast.makeText(this, selectItem.toString(), Toast.LENGTH_SHORT).show()
        }
    }
}
- 결과화면
커스텀 리스트
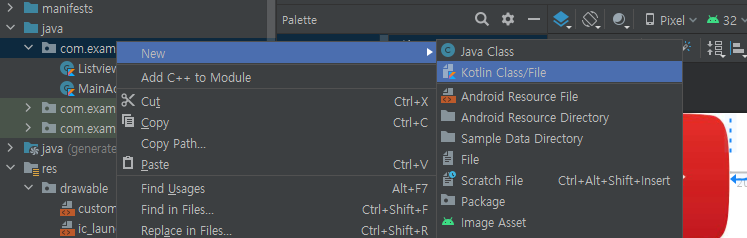
- CustomAdapter.kt는 위 그림처럼 kotlin file로 만든다
class Data(val profile:Int, val name:String)    // 이미지뷰, 텍스트뷰 설정을 위한 클래스
                                                // Drawable에서 Int형식으로 이미지를 받을 수 있음

class CustomAdapter (val context: Context, val DataList:ArrayList<Data>) : BaseAdapter(){
    override fun getCount() = DataList.size

    override fun getItem(position: Int) = DataList[position]

    override fun getItemId(position: Int) = 0L // L이 붙어야 long 형식

    override fun getView(position: Int, convertView: View?, parent: ViewGroup?): View {
        val view:View = LayoutInflater.from(context).inflate(R.layout.custom_list, null)   // context는 현재 layout임. 즉 현재 layout 코드를 통해 새로운 layout을 하나 만듬
                                                                                                // 다시말하면 custom_list.xml을 activity_listview.xml에 대입시키기 위해
                                                                                                // 새로운 layout을 만듬
        val profile = view.findViewById<ImageView>(R.id.iv_custom)
        val name = view.findViewById<TextView>(R.id.tv_custom)
        val data = DataList[position]

        profile.setImageResource(data.profile)
        name.text = data.name

        return view
    }

}
- ListviewActivity.kt
class ListviewActivity : AppCompatActivity() {
    override fun onCreate(savedInstanceState: Bundle?) {
        super.onCreate(savedInstanceState)
        setContentView(R.layout.activity_listview)

        var DataList = arrayListOf(
            Data(R.drawable.youtube_button, "0번"),
            Data(R.drawable.youtube_button_light, "1번"),
            Data(R.drawable.youtube_button, "2번"),
            Data(R.drawable.youtube_button, "3번"),
        )


        val listView = findViewById<ListView>(R.id.listView)

        listView.adapter = CustomAdapter(this, DataList)

                listView.onItemClickListener = AdapterView.OnItemClickListener { parent, view, position, id ->

            // 매개변수로 parent, view, position, id 4개가 주어져야함

           val selectItem = parent.getItemAtPosition(position) as Data
            Toast.makeText(this, selectItem.name, Toast.LENGTH_SHORT).show()
        }
    }
}
- 위 코드에서 parent.getItemAtPosition(position) as Data로 되어있는것을 주목
- selectItem.name 으로 변경한것도 주목
파일이름: custom_list.xml

<?xml version="1.0" encoding="utf-8"?>
<androidx.constraintlayout.widget.ConstraintLayout xmlns:android="http://schemas.android.com/apk/res/android"
    xmlns:app="http://schemas.android.com/apk/res-auto"
    xmlns:tools="http://schemas.android.com/tools"
    android:layout_width="match_parent"
    android:layout_height="wrap_content" > <!-- 리스트뷰는 일정 영역만 차지해야 하므로 height는 wrap_content로 둔다 -->

    <ImageView
        android:id="@+id/iv_custom"
        android:layout_width="100dp"
        android:layout_height="100dp"
        android:src="@drawable/youtube_button_light"
        app:layout_constraintStart_toStartOf="parent"
        app:layout_constraintTop_toTopOf="parent" />

    <TextView
        android:id="@+id/tv_custom"
        android:layout_width="wrap_content"
        android:layout_height="wrap_content"
        android:layout_marginStart="20dp"
        android:text="이름을 입력해주세요"
        app:layout_constraintBottom_toBottomOf="parent"
        app:layout_constraintStart_toEndOf="@+id/iv_custom"
        app:layout_constraintTop_toTopOf="parent" />

</androidx.constraintlayout.widget.ConstraintLayout>


파일이름: activity_listview.xml

<?xml version="1.0" encoding="utf-8"?>
<androidx.constraintlayout.widget.ConstraintLayout xmlns:android="http://schemas.android.com/apk/res/android"
    xmlns:app="http://schemas.android.com/apk/res-auto"
    xmlns:tools="http://schemas.android.com/tools"
    android:layout_width="match_parent"
    android:layout_height="match_parent"
    tools:context=".ListviewActivity">

    <ListView
        android:id="@+id/listView"
        android:layout_width="match_parent"
        android:layout_height="match_parent" />

</androidx.constraintlayout.widget.ConstraintLayout>
- 하지만 치명적인 단점 존재!
- 데이터가 굉장히 많아질 경우 렉걸린다!!
- 이걸 보완한것이 Recycler View
- 데이터가 굉장히 많아질 경우 렉걸린다!!
Recycler View(리사이클러 뷰)
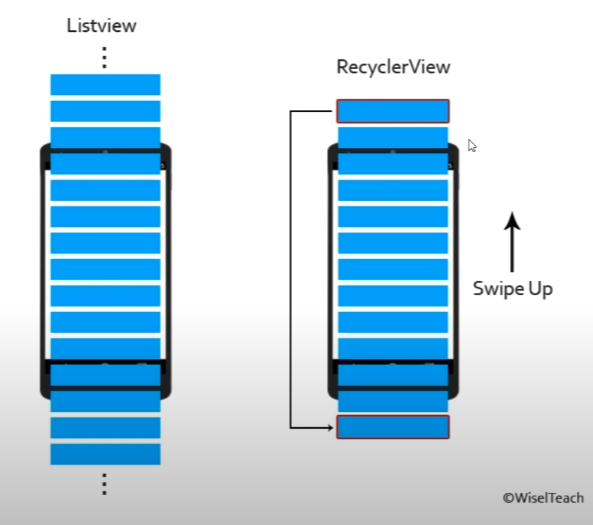
-
위 그림에서 Recycler View는 지나간 View를 다시 가져오고 데이터만 변경하는것. 즉 재활용(Recycler)
-
custom_list.xml
<?xml version="1.0" encoding="utf-8"?>
<androidx.constraintlayout.widget.ConstraintLayout xmlns:android="http://schemas.android.com/apk/res/android"
    xmlns:app="http://schemas.android.com/apk/res-auto"
    xmlns:tools="http://schemas.android.com/tools"
    android:layout_width="match_parent"
    android:layout_height="wrap_content" > <!-- 리스트뷰는 일정 영역만 차지해야 하므로 height는 wrap_content로 둔다 -->

    <ImageView
        android:id="@+id/iv_custom"
        android:layout_width="100dp"
        android:layout_height="100dp"
        android:src="@drawable/youtube_button_light"
        app:layout_constraintStart_toStartOf="parent"
        app:layout_constraintTop_toTopOf="parent" />

    <TextView
        android:id="@+id/tv_custom"
        android:layout_width="wrap_content"
        android:layout_height="wrap_content"
        android:layout_marginStart="20dp"
        android:text="이름을 입력해주세요"
        app:layout_constraintBottom_toBottomOf="parent"
        app:layout_constraintStart_toEndOf="@+id/iv_custom"
        app:layout_constraintTop_toTopOf="parent" />

</androidx.constraintlayout.widget.ConstraintLayout>
- activity_recycler.xml
<?xml version="1.0" encoding="utf-8"?>
<androidx.constraintlayout.widget.ConstraintLayout xmlns:android="http://schemas.android.com/apk/res/android"
    xmlns:app="http://schemas.android.com/apk/res-auto"
    xmlns:tools="http://schemas.android.com/tools"
    android:layout_width="match_parent"
    android:layout_height="match_parent"
    tools:context=".RecyclerActivity">

    <androidx.recyclerview.widget.RecyclerView
        android:id="@+id/recyclerView"
        android:layout_width="match_parent"
        android:layout_height="match_parent" />

</androidx.constraintlayout.widget.ConstraintLayout>
- CustomAdapter.kt
class CustomViewHolder(private val binding: CustomListBinding) : RecyclerView.ViewHolder(binding.root){
                // CustomViewHolder 클래스는 custom_list.xml 화면을 View로 만들어서 activity_recycler.xml에 붙이는 역할을 함

    val profile = binding.ivCustom // 뷰에 있는 이미지 뷰
    val name = binding.tvCustom  // 뷰에 있는 텍스트 뷰
}
class CustomAdapter(val DataList:ArrayList<Data>, val context:Context): RecyclerView.Adapter<CustomViewHolder>(){
    override fun onCreateViewHolder(parent: ViewGroup, viewType: Int): CustomViewHolder {
                                                                                                                           // custom_list가 팽창하는것

        // 뷰 바인딩으로 인해 코드 변경
        // 레이아웃이 parent.context로부터 팽창함
        val binding = CustomListBinding.inflate(LayoutInflater.from(context), parent, false)
        return CustomViewHolder(binding)
    }

    override fun getItemCount() = DataList.size     // 화면에 표시할 뷰 갯수
    override fun onBindViewHolder(holder: CustomViewHolder, position: Int) {
        holder.profile.setImageResource(DataList[position].profile)
        holder.name.text = DataList[position].name

        holder.itemView.setOnClickListener{
            Toast.makeText(context, DataList[position].name, Toast.LENGTH_SHORT).show()
        }
    }
}
- RecyclerActivity.kt
// 뷰바인딩 적용
class RecyclerActivity : AppCompatActivity() {
    private lateinit var binding: ActivityRecyclerBinding       // Activity 이름에 걸맞게 타입을 적어줘야 함

    val DataList = arrayListOf(
        Data(R.drawable.youtube_button, "0번"),
        Data(R.drawable.youtube_button, "1번"),
        Data(R.drawable.youtube_button, "2번"),
        Data(R.drawable.youtube_button, "3번"),
        Data(R.drawable.youtube_button, "4번"),
        Data(R.drawable.youtube_button, "5번"),
        Data(R.drawable.youtube_button, "6번"),
        Data(R.drawable.youtube_button, "7번"),
        Data(R.drawable.youtube_button, "8번"),
        Data(R.drawable.youtube_button, "9번"),
        Data(R.drawable.youtube_button, "10번"),
        Data(R.drawable.youtube_button, "11번")
    )

    override fun onCreate(savedInstanceState: Bundle?) {
        super.onCreate(savedInstanceState)
        binding = ActivityRecyclerBinding.inflate(layoutInflater)
        setContentView(binding.root)

        binding.recyclerView.layoutManager = LinearLayoutManager(this)      // 이 코드를 통해 화면상 수직이동이 가능해짐(스크롤뷰 마냥)
        binding.recyclerView.adapter = CustomAdapter(DataList, this)
    }
}
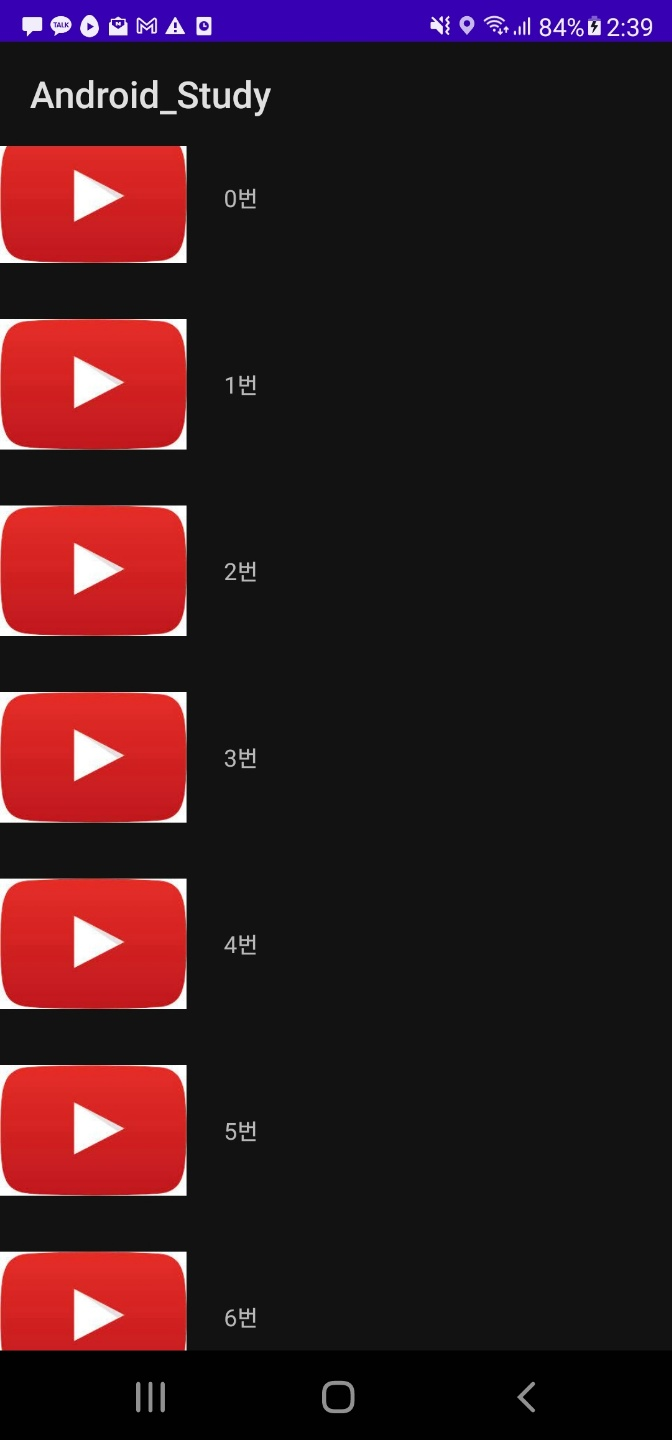
- 결과화면
카드뷰
- custom_list.xml
- cardView를 최상단에 두고 marginbottom 값을 주면 훨씬 더 예뻐진다
<?xml version="1.0" encoding="utf-8"?>
<androidx.cardview.widget.CardView
    xmlns:android="http://schemas.android.com/apk/res/android"
    xmlns:app="http://schemas.android.com/apk/res-auto"
    xmlns:tools="http://schemas.android.com/tools"
    android:layout_width="match_parent"
    android:layout_height="wrap_content"
    android:layout_marginBottom="10dp">

    <androidx.constraintlayout.widget.ConstraintLayout
        android:layout_width="match_parent"
        android:layout_height="wrap_content" > <!-- 리스트뷰는 일정 영역만 차지해야 하므로 height는 wrap_content로 둔다 -->

        <ImageView
            android:id="@+id/iv_custom"
            android:layout_width="100dp"
            android:layout_height="100dp"
            android:src="@drawable/youtube_button_light"
            app:layout_constraintStart_toStartOf="parent"
            app:layout_constraintTop_toTopOf="parent" />

        <TextView
            android:id="@+id/tv_custom"
            android:layout_width="wrap_content"
            android:layout_height="wrap_content"
            android:layout_marginStart="20dp"
            android:text="이름을 입력해주세요"
            app:layout_constraintBottom_toBottomOf="parent"
            app:layout_constraintStart_toEndOf="@+id/iv_custom"
            app:layout_constraintTop_toTopOf="parent" />

    </androidx.constraintlayout.widget.ConstraintLayout>
</androidx.cardview.widget.CardView>
- 결과화면
Fragment(프레그먼트)
코드를 통해 기초적인 Fragment 개념잡기
-
버튼 눌러서 FrameLayout의 Fragment 변경시키기
-
activity_change_fragment.xml
<?xml version="1.0" encoding="utf-8"?>
<androidx.constraintlayout.widget.ConstraintLayout xmlns:android="http://schemas.android.com/apk/res/android"
    xmlns:app="http://schemas.android.com/apk/res-auto"
    xmlns:tools="http://schemas.android.com/tools"
    android:layout_width="match_parent"
    android:layout_height="match_parent"
    tools:context=".ChangeFragmentActivity">

    <Button
        android:id="@+id/fragment_change_btn_1"
        android:layout_width="wrap_content"
        android:layout_height="wrap_content"
        android:text="Button"
        android:layout_marginStart="30dp"
        app:layout_constraintEnd_toStartOf="@+id/fragment_change_btn_2"
        app:layout_constraintStart_toStartOf="parent"
        app:layout_constraintTop_toTopOf="parent" />

    <Button
        android:id="@+id/fragment_change_btn_2"
        android:layout_width="wrap_content"
        android:layout_height="wrap_content"
        android:text="Button"
        android:layout_marginEnd="30dp"
        app:layout_constraintEnd_toEndOf="parent"
        app:layout_constraintStart_toEndOf="@+id/fragment_change_btn_1"
        app:layout_constraintTop_toTopOf="parent" />

    <FrameLayout
        android:id="@+id/activity_change_frame_layout"
        android:layout_width="match_parent"
        android:layout_height="0dp"
        app:layout_constraintBottom_toBottomOf="parent"
        app:layout_constraintEnd_toEndOf="parent"
        app:layout_constraintStart_toStartOf="parent"
        app:layout_constraintTop_toBottomOf="@id/fragment_change_btn_2" >

    </FrameLayout>
</androidx.constraintlayout.widget.ConstraintLayout>
- ChangeFragment.kt
package com.example.android_study

import android.os.Bundle
import android.view.LayoutInflater
import android.view.View
import android.view.ViewGroup
import androidx.appcompat.app.AppCompatActivity
import androidx.fragment.app.Fragment
import com.example.android_study.databinding.ActivityChangeFragmentBinding
import com.example.android_study.databinding.FragmentMyBinding

class ChangeFragmentActivity : AppCompatActivity() {

    private lateinit var binding : ActivityChangeFragmentBinding
    private lateinit var myFragment: MyFragment
    private lateinit var mySecondFragment: MySecondFragment

    override fun onCreate(savedInstanceState: Bundle?) {
        super.onCreate(savedInstanceState)
        binding = ActivityChangeFragmentBinding.inflate(layoutInflater)

        setContentView(binding.root)

        binding.fragmentChangeBtn1.setOnClickListener {
            myFragment = MyFragment.newInstance("hohohoho", "dfsfs")
            supportFragmentManager.beginTransaction().replace(R.id.activity_change_frame_layout, myFragment).commit()
        }

        binding.fragmentChangeBtn2.setOnClickListener {
            mySecondFragment = MySecondFragment.newInstance("hohohohoasfslkadjf", "Asdfsa")
            supportFragmentManager.beginTransaction().replace(R.id.activity_change_frame_layout, mySecondFragment).commit()
        }
    }
}
FragmentContainerView 활용해서 Fragment 구현하기
- FragmentContainer View를 쓰는 이유?
- FrameLayout에서 Fragment를 변경할 때 애니메이션이 자연스럽지 않은 경우가 있음 (실제로 코드로 구현해서 애니메이션 효과를 보니 FragmentContainer View가 더 자연스러움)
- 그 밖에 이유가 더 있을듯 하지만 일단은 적용 방법부터!
-
activity_container.xml
<?xml version="1.0" encoding="utf-8"?> <androidx.constraintlayout.widget.ConstraintLayout xmlns:android="http://schemas.android.com/apk/res/android" xmlns:app="http://schemas.android.com/apk/res-auto" xmlns:tools="http://schemas.android.com/tools" android:layout_width="match_parent" android:layout_height="match_parent" tools:context=".ContainerActivity"> <androidx.fragment.app.FragmentContainerView android:id="@+id/fcvMain" android:layout_width="match_parent" android:layout_height="match_parent" android:name="androidx.navigation.fragment.NavHostFragment" // navGraph를 활용하기 위해 필요 app:defaultNavHost="true" // NavHostFragment가 시스템 뒤로가기 버튼을 가로챔. 하나의 NavHost만 기본값으로 지정 가능 // 동일한 레이아웃에 여러 호스트가 있다면(예: 창이 2개인 레이아웃) 한 호스트만 기본 NavHost로 지정해야함 app:navGraph="@navigation/nav_home" // NavHostFragment를 navGraph와 연결 app:layout_constraintBottom_toBottomOf="parent" app:layout_constraintEnd_toEndOf="parent" app:layout_constraintStart_toStartOf="parent" app:layout_constraintTop_toTopOf="parent" /> </androidx.constraintlayout.widget.ConstraintLayout> - navigation/nav_home.xml
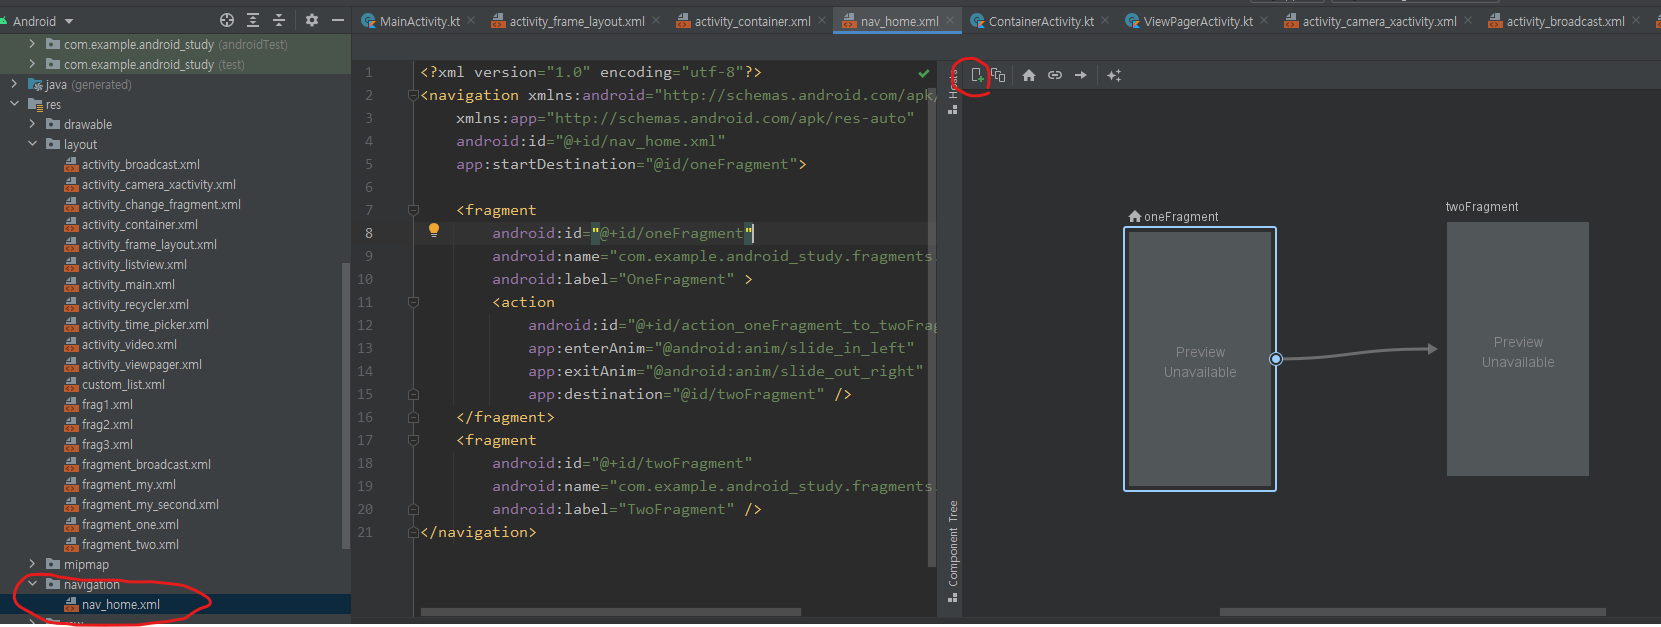
-
위 그림과 같이 navigation 디렉토리아래 nav_home.xml을 추가하고 우측 GUI 화면에서 동그라미 친 부분을 클릭해 원하는 Fragment들 추가 및 액션(화면 전환등과 같은) 설정 가능
-
fragments/OneFragment.kt
- 패키지 추가로 fragments 폴더 추가 이후 OneFragment, TwoFragment 파일 생성.

package com.example.android_study.fragments import android.os.Bundle import android.view.LayoutInflater import android.view.View import android.view.ViewGroup import android.widget.FrameLayout import androidx.fragment.app.Fragment import androidx.navigation.fragment.findNavController import com.example.android_study.ContainerActivity import com.example.android_study.FrameLayoutActivity import com.example.android_study.MainActivity import com.example.android_study.R import com.example.android_study.databinding.FragmentOneBinding class OneFragment : Fragment() { private lateinit var binding:FragmentOneBinding override fun onCreateView( inflater: LayoutInflater, container: ViewGroup?, savedInstanceState: Bundle? ): View? { binding = FragmentOneBinding.inflate(inflater) return binding.root // return super.onCreateView(inflater, container, savedInstanceState) } override fun onViewCreated(view: View, savedInstanceState: Bundle?) { super.onViewCreated(view, savedInstanceState) binding.tvOne.setOnClickListener{ if(requireActivity() is ContainerActivity){ // 만약 Containver View를 통해서 호출한다면 findNavController().navigate(R.id.action_oneFragment_to_twoFragment) } // else if(requireActivity() is FrameLayoutActivity){ // 만약 FrameLayout을 통해서 호출한다면 // requireActivity().supportFragmentManager.beginTransaction() // .setCustomAnimations(android.R.anim.slide_in_left, android.R.anim.slide_out_right) // .replace(R.id.flMain, TwoFragment::class.java, null) // .commit() // } } } }- fragment_one.xml
  <?xml version="1.0" encoding="utf-8"?>
  <androidx.constraintlayout.widget.ConstraintLayout xmlns:android="http://schemas.android.com/apk/res/android"
  xmlns:app="http://schemas.android.com/apk/res-auto"
  android:layout_width="match_parent"
  android:layout_height="match_parent"
  android:background="@color/purple_500">

  <TextView
      android:id="@+id/tvOne"
      android:layout_width="wrap_content"
      android:layout_height="wrap_content"
      android:text="One Fragment"
      app:layout_constraintBottom_toBottomOf="parent"
      app:layout_constraintEnd_toEndOf="parent"
      app:layout_constraintStart_toStartOf="parent"
      app:layout_constraintTop_toTopOf="parent"
      android:textSize="50sp"
      android:textColor="@color/white"/>

  </androidx.constraintlayout.widget.ConstraintLayout>
View Pager2(뷰 페이저2) + TabLayout(탭 레이아웃)
View Pager는 deprecated 됨
-
좌우로 슬라이드 되면서 화면에 보여지는 프레그먼트를 변경시켜 주는 것
-
activity_viewpager.xml
<?xml version="1.0" encoding="utf-8"?>
<androidx.constraintlayout.widget.ConstraintLayout xmlns:android="http://schemas.android.com/apk/res/android"
    xmlns:app="http://schemas.android.com/apk/res-auto"
    xmlns:tools="http://schemas.android.com/tools"
    android:layout_width="match_parent"
    android:layout_height="match_parent"
    tools:context=".ViewPagerActivity">

    <androidx.viewpager2.widget.ViewPager2
        android:id="@+id/viewpager"
        android:layout_width="0dp"
        android:layout_height="0dp"
        android:orientation="horizontal"
        app:layout_constraintEnd_toEndOf="parent"
        app:layout_constraintStart_toStartOf="parent"
        app:layout_constraintTop_toTopOf="parent"
        app:layout_constraintBottom_toTopOf="@+id/appbarlayout"/>

<!--    Appbar를 커스텀하거나 기능을 추가하는등에 사용 가능-->
    <com.google.android.material.appbar.AppBarLayout
        android:layout_width="0dp"
        android:layout_height="wrap_content"
        android:id="@+id/appbarlayout"
        android:theme="@style/Theme.AppCompat.Light.DarkActionBar"
        app:layout_constraintBottom_toBottomOf="parent"
        app:layout_constraintStart_toStartOf="parent"
        app:layout_constraintEnd_toEndOf="parent">

    <com.google.android.material.tabs.TabLayout
        android:layout_width="match_parent"
        android:layout_height="60dp"
        android:background="@color/white"
        app:tabIndicator="@color/design_default_color_primary"
        app:tabRippleColor="@color/design_default_color_primary"
        app:tabSelectedTextColor="@color/design_default_color_primary"
        app:tabTextColor="@color/black">

        <com.google.android.material.tabs.TabItem
            android:layout_width="wrap_content"
            android:layout_height="wrap_content"
            android:text="Monday" />

        <com.google.android.material.tabs.TabItem
            android:layout_width="wrap_content"
            android:layout_height="wrap_content"
            android:text="Tuesday" />

        <com.google.android.material.tabs.TabItem
            android:layout_width="wrap_content"
            android:layout_height="wrap_content"
            android:text="Wednesday" />
    </com.google.android.material.tabs.TabLayout>

    </com.google.android.material.appbar.AppBarLayout>

</androidx.constraintlayout.widget.ConstraintLayout>
- fragment_my.xml
<?xml version="1.0" encoding="utf-8"?>
<FrameLayout xmlns:android="http://schemas.android.com/apk/res/android"
    xmlns:tools="http://schemas.android.com/tools"
    android:layout_width="match_parent"
    android:layout_height="match_parent"
    tools:context=".MyFragment">

    <!-- TODO: Update blank fragment layout -->
    <TextView
        android:id="@+id/textview"
        android:layout_width="wrap_content"
        android:layout_height="wrap_content"
        android:layout_gravity="center"
        android:text="@string/hello_blank_fragment"

        />

</FrameLayout>
- MyFragment.kt (프래그먼트 뷰 바인딩 코드도 있음. Activity 뷰 바인딩과 약간 다름)
package com.example.android_study

import android.os.Bundle
import androidx.fragment.app.Fragment
import android.view.LayoutInflater
import android.view.View
import android.view.ViewGroup
import com.example.android_study.databinding.FragmentMyBinding

// TODO: Rename parameter arguments, choose names that match
// the fragment initialization parameters, e.g. ARG_ITEM_NUMBER
private const val ARG_PARAM1 = "param1"
private const val ARG_PARAM2 = "param2"

/**
 * A simple [Fragment] subclass.
 * Use the [MyFragment.newInstance] factory method to
 * create an instance of this fragment.
 */
class MyFragment : Fragment() {
    // TODO: Rename and change types of parameters
    private var param1: String? = null
    private var param2: String? = null

    private var _binding: FragmentMyBinding? = null
    private val binding get() = _binding!!

    override fun onCreate(savedInstanceState: Bundle?) {
        super.onCreate(savedInstanceState)
        arguments?.let {
            param1 = it.getString(ARG_PARAM1)
            param2 = it.getString(ARG_PARAM2)
        }
    }

    override fun onCreateView(
        inflater: LayoutInflater, container: ViewGroup?,
        savedInstanceState: Bundle?
    ): View? {
        // Inflate the layout for this fragment

        _binding = FragmentMyBinding.inflate(inflater, container, false)
        return binding.root
//        return inflater.inflate(R.layout.fragment_my, container, false)
    }

    override fun onDestroyView() {
        _binding = null     // Fragment가 없어질 때 _binding을 null 처리함
        super.onDestroyView()
    }

    override fun onViewCreated(view: View, savedInstanceState: Bundle?) {
        binding.textview.text = param1

//        super.onViewCreated(view, savedInstanceState)
    }

    companion object {
        /**
         * Use this factory method to create a new instance of
         * this fragment using the provided parameters.
         *
         * @param param1 Parameter 1.
         * @param param2 Parameter 2.
         * @return A new instance of fragment MyFragment.
         */
        // TODO: Rename and change types and number of parameters
        @JvmStatic
        fun newInstance(param1: String, param2: String) =
            MyFragment().apply {
                arguments = Bundle().apply {
                    putString(ARG_PARAM1, param1)
                    putString(ARG_PARAM2, param2)
                }
            }
    }
}
- MyPagerAdapter.kt
- 뷰 페이저를 위한 어댑터이며 두개 메소드를 override 해야함
- createFragment를 통해 parameter에 값을 전달해 줄 수 있음
package com.example.android_study

import androidx.fragment.app.Fragment
import androidx.fragment.app.FragmentActivity
import androidx.viewpager2.adapter.FragmentStateAdapter

class MyPagerAdapter(fa: FragmentActivity) : FragmentStateAdapter(fa){      // 주 생성자의 fa값을 부모의 생성자로 넘김
    private val NUM_PAGES = 3

    override fun getItemCount() = NUM_PAGES

    override fun createFragment(position: Int): Fragment {
        return when(position){
            0 -> {MyFragment.newInstance("Page1", "")}  // 얘네가 아까 Fragment의 두개 param1, param2에 들어가는것
            1 -> {MyFragment.newInstance("Page2", "")}
            else -> {MyFragment.newInstance("Page3", "")}
        }
    }


}
- ViewPagerActivity.kt
class ViewPagerActivity : AppCompatActivity() {
    private lateinit var binding: ActivityViewpagerBinding
    private val images = listOf(
        R.drawable.idol1,
        R.drawable.idol2,
        R.drawable.idol3,
    )
    override fun onCreate(savedInstanceState: Bundle?) {
        super.onCreate(savedInstanceState)
        binding = ActivityViewpagerBinding.inflate(layoutInflater)
        setContentView(binding.root)

        binding.viewpager.apply{
            adapter = MyPagerAdapter(context as FragmentActivity)
            setPageTransformer(ZoomOutPageTransformer())
        }

        TabLayoutMediator(binding.tabs, binding.viewpager){ tab, position ->
            tab.text = "Title $position"        // tab에 표시할 텍스트
            tab.setIcon(images[position])
        }.attach()
    }

}
- ZoomOutPageTransformer()는 특수효과를 주기위한 클래스로 안드로이드 개발자 홈페이지 가면 있다
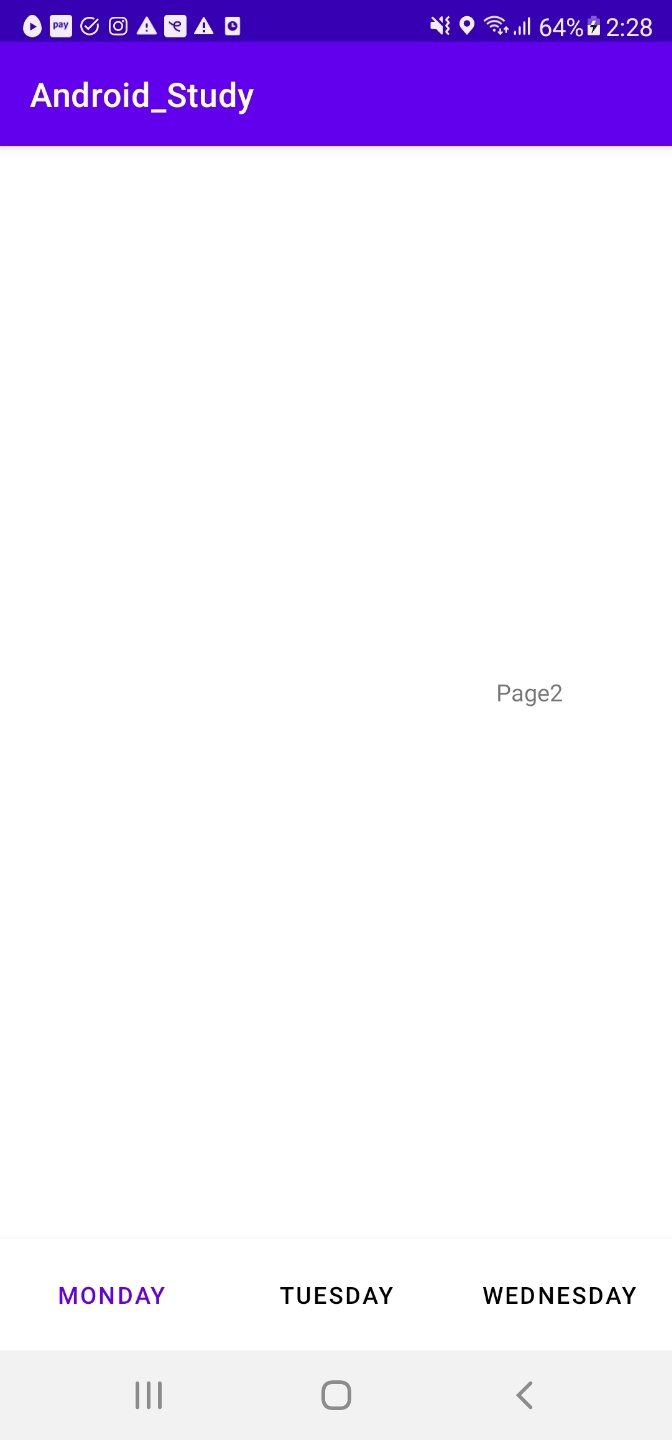
- 슬라이드로 이동 가능!
안드로이드 이해가 어려운 코드 해석
버튼 리스너
bt=(Button)findViewById(R.id.click);
bt.setOnClickListener(new OnClickListener(){
    public void onClick(View v) {
    // TODO Auto-generated method stub
        Toast.makeText(getApplicationContext(), "You made a mess", Toast.LENGTH_LONG).show();
    }

});
- Button 클래스의 setOnClickListener
- new OnClickListener()
- View.OnClickListener 클래스의 인스턴스 생성
- 뒤에 이어서 나오는 { }는 SAM(Single Abstract Method) 변환에 의해 나옴
- SAM 변환이란 람다식이 바로 인터페이스의 추상메소드 구현부가 되는 것을 의미
et_pw.setOnEditorActionListener() { v, actionId, event ->
            if(actionId == EditorInfo.IME_ACTION_DONE){
                Login(v)
                true
            } else {
                false
            }
        }
- 위 코드를 이해하기 위해서는 람다식과 그 축약형에 대한 이해가 필요하며 코틀린 기초의 람다 챕터에서 볼 수 있음
- EditText의 Enter 눌렀을 때 발생하는 리스너 이벤트를 다루기 위한 함수임
- setOnEditorActionListener()의 TextView.OnEditorActionListener 타입은 인터페이스이며 SAM(Single Abstract Method)이다
- 즉, 인터페이스이며 추상메소드를 딱 하나만 가지고 있음
- 따라서 추상 메소드를 람다식으로 바로 override 할 수 있음
-
추상 메소드 구현에 필요한 입력 파라미터가 3개이므로 -> 생략 못함


TabLayoutMediator(탭 레이아웃 구현)
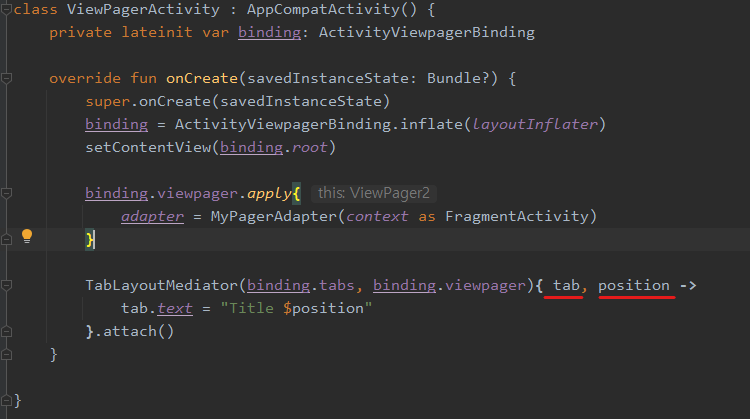
- 위 밑줄 친 두개 입력 변수에 값이 있는것인가? 그렇지 않다!
- 단지 람다식이 TabLayoutMediator 함수의 마지막 파라미터(자바 인터페이스) 의 추상 메서드에
값이 들어오면 어떻게 처리가 될지를명시해준 역할을 함 - 실질적인 값은 이벤트가 발생할 때 들어감
- 단지 람다식이 TabLayoutMediator 함수의 마지막 파라미터(자바 인터페이스) 의 추상 메서드에
View에 애니메이션 추가
- Readme 참고
settings.gradle (Project Settings)에 아래 코드 추가
allprojects {
	repositories {
		...
 		maven { url 'https://jitpack.io' }
	}
build.gradle (Module)에 아래 코드 추가
dependencies {
	implementation 'com.github.gayanvoice:android-animations-kotlin:1.0.1'
}